SquibitUC Portal | Answering Rules Module

The articles on how to customize the default rule and add a customized rule cover most of this module. It is highly recommended to read both of these to get a good understanding of this module.
The only thing left to cover here would be the Allow/Block button located top right corner of the pane next to the "Add Rule" button. Click "Allow/Block". If there is no current disruption being caused by inbound calls, we recommend leaving this unchanged.

The pop-up has three sections.
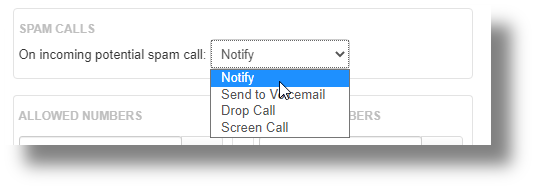
SPAM CALLS has a single drop-down with four options. Anything categorized as spam will follow the action that is selected in this drop-down.

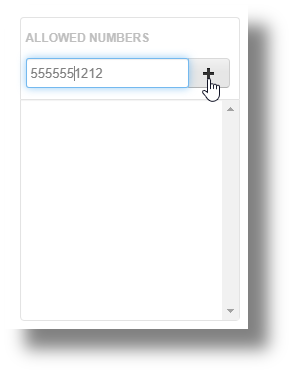
ALLOWED NUMBERS would be for false positives. If a call comes in that is catogorized as SPAM and you would like to whitelist it, simply enter the 10-digit number and click the "+".

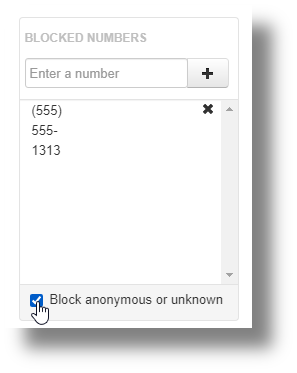
BLOCKED NUMBERS to obviously reject any unwanted calls. There is a checkbox at the bottom of this section that allows a blanket rule to be applied that would block ALL unknown unidentified callers. Click "Done" when finished.


It is important to note that these are per user settings, and only apply to calls coming directly to the user. They will not apply to calls that hit queues or other users phones. It will also not override ring groups. If a call comes into a ring group and rings a phone where that number is blocked, it will still ring.
Related Articles
SquibitUC Portal | The Home Module
The Home module is basically the dashboard that appears when you login to the portal. The New Voicemail Pane There are 2 larger panes on the left and 2 panes on the right. The top-left pane are new voicemail messages. The messages are time stamped ...Customizing the Default Answering Rule
Login to the SquibitUC portal https://portal.squibituc.com/ Click on the Answering Rules module. There will only be one rule by default called "Default". Before diving into the rule to view and change the default behavior, set the ring time to an ...Creating a New Custom Answering Rule
To get more familiar with the default answering rules: Recommended reading: https://kb.squibituc.com/portal/en/kb/articles/customizing-the-default-answering-rule To create a new answering rule, there first has to be a time frame that is defined. The ...SquibitUC Portal | The Call History Module
The Call History module has a few unique functions that are very useful. The pane shows a perpetual history of calls sorted by date (newest). At the bottom of the page, there are more viewing options such as how many messages to view on a page at a ...SquibitUC Portal | Time Frames Module
The Time Frames module was covered in it's entirety in this article: Creating a New Custom Answering Rule